OSX: Converting Parallels or VMWare to VirtualBox
This post is a step by step explaining how to convert a Parallels Virtual Machine to a VirtualBox Virtual Machine.
If this post helps you out, I’m collecting money for Christies Cancer Hospital and it would be good if you could contribute a small donation. Details at the bottom…
I use Windows on my Mac in two ways: Vista Premium through bootcamp and Windows 7 and Windows XP as virtual machines through the OSX desktop.
Previously I was using Parallels to run my virtual machines but since my trial version expired I wasn’t able to access my virtual OS any more. Then I came across Sun’s free offering VirtualBox (in this walkthrough I’m running VirtualBox version 2.1.4) – it does everything I need, and it’s free!
The only pickle with switching virtual machine software was I didn’t want the hassle of re-loading Windows XP as I’d spent some time building it up/adding programs etc under Parallels.
After much googling I came across a number of solutions, however, none as easy as the one I am suggesting here. If anyone else is in the same situation, I hope it helps:
Converting a Parallels virtual machine to VirtualBox:
1. Download the trial version of VMWare Fusion (I used version 2.0.2.)
2. Once installed, start VMWare Fusion, and choose File > Import from the menu
3. Browse to the Parallels folder (if it doesn’t default there) and choose the appropriate directory (e.g. Windows XP) and then choose the relevant file ending in .pvs e.g. Windows XP.pvs
You’ll now see a window like this:
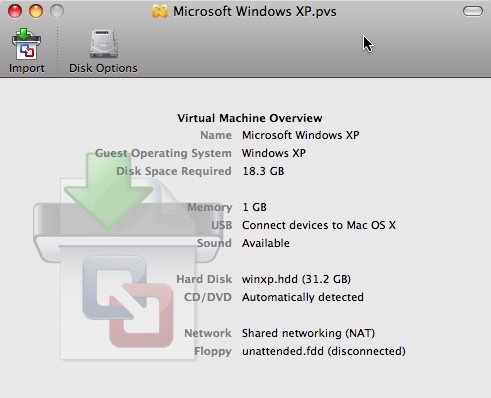
4. Click the Import button. Choose a name & location for the new machine and click ‘Save’
5. Watch something on TV, go walk the dog, contemplate life. Whatever you do, it will probably take a good 30 mins.
6. Eventually you will get a confirmation message. Great so far. Trouble is, we don’t want it to work in VMWare Fusion, we want it to work in VirtualBox. So…
7. Using the Finder locate the new VMWare Fusion version of the Windows XP virtual machine (the file will be wherever you saved it in Step 5 and will end with a .vmwarevm extension e.g. ‘Windows XP.vmwarevm’). Now right-click the file and select ‘Open Enclosing Folder’ from the menu.
8. From the next Finder window, right click on the same file again but now choose ‘Show Package Contents’.
9. In the window that now opens, copy all those files (most end .vmdk) and paste them into a new folder someplace else. I called mine ‘WINXP’ and saved it on the desktop but you can put it anywhere you like.
10. Shut down VMWare Fusion
11. Open VirtualBox
12. Click ‘New’, then ‘Next’, then name your OS e.g. ‘Windows XP’ and choose the relevant settings on the two drop downs below. Here is what I mean:

13. Now click ‘Next’, accept the defaults on the next screen and click ‘Next’ again.
14. On the next screen (headed as ‘Virtual Hard Disk’), click the ‘Existing’ button.
15. On the window that opens, click ‘Add’ on the top menu and browse to the folder you made in Step 9. Choose the file name e.g. winxp.vmdk (don’t choose the numbered ones e.g. winxp-s016.vmdk) and click ‘Open’.
16. Back on the main screen now, click ‘Next’ again and then ‘Finish’.
Et Voila! You now have your Parallels machine working in VirtualBox.
**If that worked/helped, show your appreciation by sending a donation. All the money I receive here will be donated to Christies Cancer Hospital (based in Manchester here in the UK).**
[paypal-donation]
I’m trying to go direct from VMWare to Virtualbox and followed your instructions, but when I go to start the VM, it just hangs at the point where the screen is black with a white bar along the bottom (ie before even booting properly into Windows). Would it have anything to do with trying to import from a VMWare whose demo period has already expired?